Tilox
Okay, now we know how to make a basic game using Bloxley. But, the game that we made… isn’t very impressive looking. Our workers are animated, but they just slide from place to place, with the same static image. That’s not cool. So for our second tutorial, we’re going to work on polish.
Since our focus is on improving the animations, we’re going to implement a pretty simple game. Simple, but still interesting. I’ve seen it called “Hock”, and “Tilox”, and has at least two implementations on the web: Tilox by Lightforce Games, and Hock by Lutz Tautenhahn. It seems Hock is the original name, but I first saw it as Tilox, so that’s what we’ll call it here.
In Tilox, you have player characters that can either (a) move from one square to an adjacent square, or (b) jump over an adjacent square to land on the next square over. When a character leaves a square, that square disappears. When there’s only the square you’re standing on left, you win–but if you jump off into nothingness, you lose.
You can see our implementation below. The arrow keys will move the character, and holding down Shift while hitting the arrow keys will cause the character to jump. Like with Sokoban, Backspace will undo and Shift+Backspace will reset the level.
Let’s break this tutorial up into three parts:
- Setting up the game structure.
- Implementing the game.
- Improving the graphics.
Implementing Tilox
Step 1: Setting up the game structure
We’ll start by creating a folder for this project, and inside create another folders called tilox. Inside the flash folder, create a new flash file called Tilox.fla. You can download the graphics we’ll use here: Tilox Graphics. In the final result above, I set the flash dimensions to 256px x 256px, and the frame rate up to 30fps, but neither are strictly necessary.
Make sure the Classpath for this project contains $LOCALDATA and the directory that contains Bloxley.
So now we need to figure out what classes we’re going to create. Put all of these files in the tilox directory. First, we know we’ll need a Game controller, so in the tilox directory create TiloxGame.as and insert the following code:
package tilox {

    import flash.display.Stage;

    import bloxley.controller.game.*;

    public class TiloxGame extends BXGame {

        public function TiloxGame(stage:Stage) {
            super(stage);

            controllers({ Patch: TiloxPatchController, Play: TiloxPlayController, Player: TiloxPlayerController });
        }

    }

}
We know we’ll need a patch controller, so create TiloxPatchController.as and insert the following code:
package tilox {

    import bloxley.model.game.*;
    import bloxley.controller.game.*;
    import bloxley.controller.event.*;
    import bloxley.view.sprite.*;
    import bloxley.view.animation.BXFreeAnimation;

    public class TiloxPatchController extends BXPatchController {

        public function TiloxPatchController(name:String, game:BXGame) {
            super(name, game);

            tiles({ Floor: ".@", Pit: "#" });
        }

    }

}
We’ll also need an actor controller–only one in this case, since there’s only one kind of object moving around. Create TiloxPlayerController.as and insert the following code:
package tilox {

    import bloxley.model.game.BXActor;
    import bloxley.controller.game.BXActorController;
    import bloxley.controller.event.*;
    import bloxley.view.sprite.*;

    public class TiloxPlayerController extends BXActorController {

        public function TiloxPlayerController(name, game) {
            super(name, game);

            setBoardString("@");
        }

        override public function key(options = null):String {
            return "Player";
        }

        override public function canBePlayer(actor:BXActor):Boolean {
            return true;
        }

    }

}
And finally we’ll need a play controller. Create TiloxPlayController.as and insert the following code:
package tilox {

    import bloxley.controller.game.*;
    import bloxley.controller.pen.*;
    import bloxley.controller.event.BXAction;
    import bloxley.base.BXSystem;
    import bloxley.view.gui.BXImage;

    public class TiloxPlayController extends BXPlayController {

        public function TiloxPlayController(name: String, game:BXGame) {
            super(name, game);
        }

    }
}
To go along with this, place the following code into the Frame Actions in tilox.fla:
import tilox.*;

var game = new TiloxGame(stage);

game.loadLevel([
    ".#######",
    "....####",
    ".###.@.#",
    ".#######",
    ".#...###",
    "###.####",
    "....####",
    "########",
]);

game.setCurrentGameController("Play");
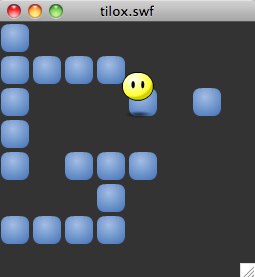
And that should be enough to get us started. If you run the flash file, you should get something that looks like this:
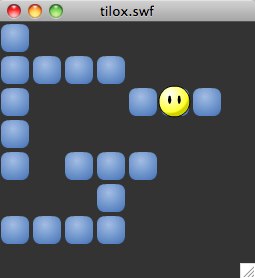
If it doesn’t, then run through the steps again, making sure you didn’t miss anything. Setting the classpath for both the actionscript code, and the bloxley library, is especially important, and easy to forget.
When running the game, you’ll notice that it’s similar to Sokoban before we implemented any behavior. You can move the player around, and he’ll animate its movements, but it will treat all patches the same.
But it’s a start.
Step 2: Implementing Tilox
So in this step, there’s really four things we need to implement. However, they’ll take us into parts of Bloxley that we haven’t discussed yet.
- Floor patches break when you step off of them.
- Jumping.
- What happens if you end up in a pit.
- Win and Lose conditions.
Let’s start with breaking floor tiles. As you can see in TiloxPatchController.as, we defined two kinds of patches–floors, which players can stand on, and pits, which players can’t. So we want to change the code so that when a player exists a floor, it becomes a pit.
Luckily, there’s an event for that. Similar to the enter event we used in Sokoban, there’s an exit event that gets called when an actor moves off of a patch. Specifically, if an actor with key ActorKey exits a patch with key PatchKey, the first method in the following list that is defined gets called on the patch controller:
can<ActorKey>Exit<PatchKey>()canExit<PatchKey>()can<ActorKey>Exit()canExit()— this method is defined in the base classBXPatchController, so if it gets to this level, this method is always called (and does allows the event to succeed).
This technique–called Method Cascading–allows us to define generic methods for common behavior, and override that with custom behavior defined in specific methods. Bloxley frequently uses it to allow flexibility in customizing behavior. In Sokoban, we used it to take canWorkerEnterWall(), a method that prevented workers from stepping on walls, and made it more generic by changing the name to canEnterWall(), so that blocks couldn’t be pushed onto walls, either.
In Tilox’s case, we don’t really need to worry about the actor key, since we have only one kind of actor. So simply defining canExitFloor() will allow us to define the behavior we want. Like with the enter actions, these event methods will all be given three arguments: the action that caused the event, the source actor, and the target patch. So inside the TiloxPatchController class, define the following method:
public function canExitFloor(action:BXMoveAction, source:BXActor, target:BXPatch) {
    action.causes( new BXPatchChangeAction(target, "Pit") );
}
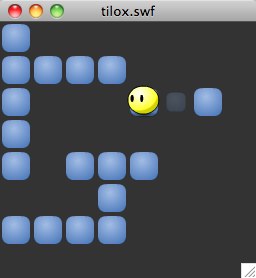
BXPatchChange, not too surprisingly, is an action that changes a patch from one type to another. If you re-run the code now, you’ll see that when the player steps off of a floor, it disappears. Not very exciting, but we can change that later. Nothing happens when the player steps off of a pit, which it shouldn’t yet. So far, so good.
Next we want to handle jumping. When you hit one of the arrow keys, the player moves one step in whatever direction was hit. What we’d like is that, when you hold down Shift and hit an arrow key, the player jumps two steps in that direction. To implement that, we first need to look into what happens when you hit the arrow key.
Pens
In any Bloxley game, we have the User who is playing the game, and the Controller which handles the game logic. However, the user communicates with the game through button presses and mouse movements–and the controller communicates through moving the actors, and changing the patches. So there needs to be some intermediary that can speak to both users and controllers.
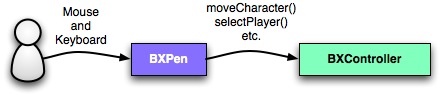
Bloxley calls this intermediary a Pen. Pens take in user interactions like key presses, and tell the controller what that key press means. All pens are a subclass of BXPen, although there’s a special subclass called BXPlayPen designed for pens used in gameplay. The only behavior that BXPen directly implements is Delete for undo, and Shift+Delete for resetting the level. BXPlayPen, however, also includes using the arrow keys to move the currently selected actor, Space to change the currently selected actor, and some mouse control as well.
In Tilox, we want to change what the arrow keys do. So we’ll create our own special subclass of BXPlayPen, called TiloxPlayPen. In the tilox directory, create the file TiloxPlayPen.as and insert the following code:
package tilox {

    import bloxley.controller.game.BXPlayController;
    import bloxley.controller.pen.BXPlayPen;
    import bloxley.model.data.BXDirection;

    public class TiloxPlayPen extends BXPlayPen {

        public function TiloxPlayPen(controller:BXPlayController) {
            super(controller);
        }

        override public function arrow(direction:BXDirection, shift:Boolean, alt:Boolean, ctrl:Boolean) {
            controller.respondTo("moveCharacter", [ direction, shift ? 2 : 1 ]);
        }

    }
}
As you can see, there’s a method called arrow() which gets called when an arrow key is hit, and the direction of the arrow key is passed in, as well as the state of the modifier keys (Shift, Alt, and Control).
What we’re doing when the arrow key gets hit is calling moveCharacter() on the controller, which will be our TloxPlayController. Rather than calling it directly, we’re using the indirect “respondTo” method, because that (a) allows hooks around when moveCharacter() gets called, and (b) allows the controller to easily pass the call onto another object, in case the controller doesn’t handle moveCharacter() directly. (In this case it does, but we still should always have the pens speak to the controller through respondTo()).
The second argument to respondTo() is the array of parameters, so when moveCharacter() gets called, the direction and the number of steps will get passed in (2 if shift is being held down, 1 otherwise). moveCharacter() knows how to handle both of those arguments, so we don’t need to redefine it–but we do need to tell the play controller about our new pen.
So open up tilox/TiloxPlayController.as and insert the following method:
override public function createPens() {
    var pen = new TiloxPlayPen(this);
    pen.setName("Play");

    var pen1 = new BXGameOverPen(this);
    pen1.setName("GameOver");
}
createPens() is just a convenient place to define the creation of pens. As you can see, we’re creating two pens: one is our new TiloxPlayPen, and the other is a BXGameOverPen–that handles the interaction when the game has been won (or lost). We won’t talk too much about it this time.
Now if you run Tilox, you’ll be able to make the player jump around by holding down Shift. The only visual difference will be that the cell jumped over won’t turn into a pit.
Next thing we want to tackle is falling into a pit. In Sokoban you can beat a level, but not lose. In Tilox, we want to be able to lose as well as win. So, we want to make the player “go away” when they jump into a pit. In Bloxley, this is called disabling the actor. It makes the actor’s sprite disappear, and they can’t be selected as the active actor any more. (In Tilox, this is a bad thing–but in other games, disabling an actor is useful for when they exit the level).
So, open up TiloxPatchController, and insert the following method:
public function canEnterPit(action:BXMoveAction, source:BXActor, target:BXPatch) {
    action.causes( new BXDisableAction(source) );
}
This is pretty easy to understand–it gets called when an actor enters a Pit patch, and causes the actor to become disabled. If you run the flash app, and jump off into nothingness, you’ll see the actor fade away. Now we just need to hook that into ending the game.
As we discussed in the last tutorial, Bloxley’s default game flow includes a pair of methods didBeatLevel() and didLoseLevel() where you can determine if the level was beaten or not. Bloxley checks to see if a level was lost, before it checks whether a level was beaten–so if both conditions are reached at the same time, the level will be lost. (I’m mentioning this because it’s relevant for Tilox.)
So, first: winning. In standard Tilox, you win when there is only one floor patch left–the patch you’re standing on. In the TiloxPlayController class, insert the following method:
override public function didBeatLevel():Boolean {
    return board().allPatches().ofType("Floor").areExactly(1);
}
I think this method is pretty readable. It takes the board, looks at all of the patches, gets only the patches that are Floors, and counts how many of those there are. If there is exactly 1, then the level has been beaten.
Next, losing. The user loses a game of Tilox if the player has jumped into a pit and been disabled. In the TiloxPlayController class, insert the method:
override public function didLoseLevel():Boolean {
    return board().allActors().theFirst().isDisabled();
}
This method looks at the first (and only) actor on the board, and returns true if it has been disabled.
Since we want to be able to display when the game is won and lost, also stick the following method into TiloxPlayController:
override public function createInterface() {
    super.createInterface();

    var screen = BXSystem.screenDimensions();

    setBank("Beat Level");
        var image = new BXImage(this, "BeatLevel", { centered: true, depth: 1 });
        image.goto([ screen[0] * 0.5, screen[1] * 0.5 ]);
        register( image );

    setBank("Lost Level");
        var image2 = new BXImage(this, "LostLevel", { centered: true, depth: 2 });
        image2.goto([ screen[0] * 0.5, screen[1] * 0.5 ]);
        register( image2 );
}
Make sure that the linkage class for your winning banner is set to game.BeatLevel, and the linkage class for your losing banner is set to game.LostLevel. It’s already set in the provided graphics, but if you decide to change them, you’ll have to make sure that you do this.
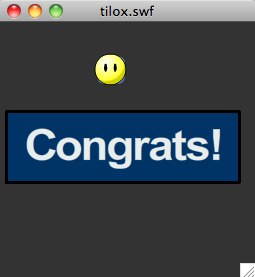
Once again, run Tilox. Now when you beat the level, you’ll get a nice message saying so:
And when you lose the level, you’ll get a message saying you lost:

Step 3: Improving the Graphics
So now we’re about where we were at the end of the Sokoban tutorial–we have a playable game with correct end game conditions, but it’s not very good looking. So let’s set about improving that. I can think of four places where the game could use some polish:
- The player sprite should be a little fancier than just a static image.
- When the player moves around, jumping instead of sliding would look good
- And while we’re at it, making it face the direction of motion would be good, too.
- Having the floor disappear instead of just changing.
So let’s get started.
First, we want the player sprite to look better. That means not just having a single static image; let’s put a slight shadow under the sprite. That’ll definitely look good when we have the actor jump. Open up tilox/BXTiloxPlayerController.as, and insert the following methods:
override public function initializeSprite(actor:BXActor, sprite:BXSprite) {
    var comp:BXCompositeSprite = sprite as BXCompositeSprite;

    comp.layer(0).goto([0, 0]);

    comp.addSpriteLayer("Shadow", { depth: 1 });
    comp.swapLayers(0, 1);
}
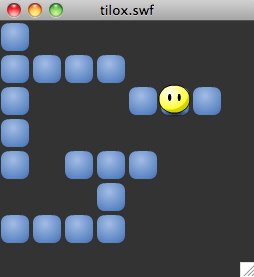
So, here we’re defining initializeSprite(). This method gets called when an actor’s sprite is first created. It allows you to set up the sprite in whatever way you want it. In our case, we’re using it to add another image (a shadow) into the sprite, and then calling swapLayers() to place it below the main sprite image (which defaults to depth 0). Run Tilox and take a look; it’s subtle but you can see it when you compare this screenshot with the last:
Now we want to make the player jump around a bit. In the same class, insert the following methods:
override public function defaultSpeed():Number {
    return 5.0;
}

override public function animateMove(actor:BXActor, action:BXMoveAction) {
    var sprite = spriteForActor(actor);
    var body = sprite.layer(1);

    return [
        sprite.goto(action.newPosition, { speed: defaultSpeed() }),
        body.shift([0, -8.0 * action.steps()], { seconds: action.steps() / defaultSpeed(), blend: "bounce" })
    ];
}
Now what are we doing here? The defaultSpeed() method is just a convenient way to change the animation speed. Fine. But what is this animateMove() method?
Well, to explain, let’s talk about actions and animations for a second. As we said in the first tutorial, every game state change should be performed by an action. For moving actors around, that action, as we’ve seen, is BXMoveAction. However, every action also needs to provide an animation–that way the animations for each action can be properly placed in time sequence.
However, we don’t want to have to subclass BXMoveAction every time we want to change its animation; that seems excessive. And it gets even worse when different actors get animated differently. Instead, we’ll notice that while every action need to provide its animation, it doesn’t need to produce it. So, most actions just pass the request off to a controller–actor, patch, or game–since that will be subclassed anyway, and it is the kind of thing that the control layer should do. So, BXMoveAction calls animateMove() on the controller of the actor that is moving, and that method generates the animations necessary.
In our case, we’re returning an array of two separate animations. When this action gets animated, both of the animations will occur at the same time. What are our two animations?
sprite.goto(action.newPosition, { speed: defaultSpeed() }): This is the usual default move animation. It moves the sprite from its current location, to its new location, at a speed of defaultSpeed() (in patch lengths per second).
body.shift([0, -8.0 * action.steps()], { seconds: action.steps() / defaultSpeed(), blend: "bounce" }): This is more interesting.
- First of all, it just animates the yellow body of the sprite, and not the entire thing.
- Secondly,
shift()moves the sprite, but as an adjustment to its real location. The sprite remembers where it really is, but displays itself at a slightly shifted location. The adjustment we have to provide in pixels rather than patch lengths because it is a component of the sprite, rather that the entire sprite. (This is a limitation of Bloxley that will get fixed). - Passing in a
secondsoption allows us to say how long the animation should take. - And finally,
blend: "bounce"tells Bloxley that, rather than adjusting the shift from the starting value (0) to the final value (-8 or -16), it should start at 0, go up to that final value, and then back down to 0. So you can kinda picture how this is a jump.
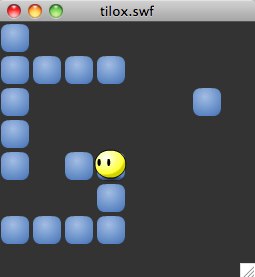
Now if you run Tilox, you’ll see how the player jumps around the screen instead of sliding. Already, a lot more interesting! Notice how the shadow stays on the ground while the player’s body jumps:
Now, we want to have the player face the direction it moves in. We could get really complicated with this, but I think just moving the eyes will be pretty effective. If you look at the frames of the ‘Player’ movie clip, you’ll see that there are frames named “North”, “South”, “East”, and “West”. We’ll use the “West” frame to show when the player is moving “West”, etc.
Luckily, since we’re already defining our own move animation, we can just modify it to change the sprite’s frame when we move. In the array of animations that animateMove() returns, insert the following line:
body.frame(action.direction().toString(), { wait: true })
As you can see, we added another animation to the array; this one is a call to frame(), which animates changing frames. Normally, instantaneous animations (ones with no speed or seconds option) are performed as soon as they are created. Mostly, that’s what you want, but not in animation methods. The wait: true option we pass in tells Bloxley to hold off on it, it will be started by some other object. Leaving this out will cause strange graphical glitches which can be tricky to track down.
So, run Tilox again, and you’ll see the player sprite looking where it is going. Excellent!
Our final step is having the floor disappear. Phew!
Rather than having the floor simply disappear, we’ll instead have it (a) shrink down to a dot, and (b) fade away to nothingness. To accomplish that, we first need to have the two pieces of the floor (the black background, and the blue tile) be controlled by Bloxley, rather than Flash. So open up TiloxPatchController and put these methods inside:
override public function frameName(patch:BXPatch):String {
    return "Pit";
}

override public function initializeSprite(patch:BXPatch, sprite:BXSprite) {
    if (patch.isA("Floor")) {
        var comp:BXCompositeSprite = sprite as BXCompositeSprite;

        var floor = comp.addSpriteLayer("WeakFloor", { depth: 1, centered: true });
        floor.goto([ 16.0, 16.0 ]);
    }
}
The first method, frameName(), tells Bloxley to always use the “Pit” frame. That gets the “Floor” frame’s floor tile out of the way. Next, initializeSprite() is used identically to initializeSprite() in TiloxPlayerController–to set up what the sprite will look like. In this case, we’re adding a “WeakFloor” image to the center of the patch sprite. To make it easier to resize, centered: true tells Bloxley that its registration point is in the center of the image.
Now if you run Tilox, it will look the same as before, but the floor tiles will no longer disappear when you walk over them. This is because they’re all already on the “Pit” frame, so the default animation doesn’t change anything. We’ll have to fix that. Add the following method to TiloxPatchController:
override public function animatePatchChange(patch:BXPatch, action:BXPatchChangeAction) {
    var layer = (spriteForPatch(patch) as BXCompositeSprite).layer(1);

    return [
        layer.hide({ seconds: 0.5, blend: "snap" }),
        layer.resize([0.0, 0.0], { seconds: 0.5, blend: "accel" })
    ];
}
Having defined animateMove() for the player controller, we’re in a much better position to understand what we’re doing here. Following the code, we’re taking the layer at depth 1 (which we created in initializeSprite() to be the floor tile), and simultaneously (a) hiding it, and (b) resizing it to nothing. We’re using two new blends here–”snap” starts changing quickly and slows down, and “accel” starts slowly and speeds up.
Run Tilox one more time, and you’ll see it working! Excellent, it looks much nicer than before.
However, you’ll soon find one more problem: undo. Yes, when you undo a step, the floor tile won’t reappear. That’s because we’re still using the default undo animation. We need to replace that. Insert the following method into TiloxPatchController:
override public function animateUndoPatchChange(patch:BXPatch, action:BXPatchChangeAction) {
    var layer = (spriteForPatch(patch) as BXCompositeSprite).layer(1);

    return [
        layer.show(),
        layer.resize([28.0, 28.0])
    ];
}
It’s pretty clear that this is a reverse of what we’re doing in animatePatchChange(), but you’ll notice that we’re no longer specifying a seconds option. Like we discussed above, when we don’t specify speed, seconds, or wait, the animation takes place instantly–which is fine for undo animations.
So, run Tilox one last time, and you should see everything working together. If you want, you can make any of the animations even more complicated and interesting–hopefully this tutorial showed you how it’s done!
Next Time: Threesome
In our next tutorial, we’ll develop a game called Threesome. Rather than focusing on implementing the gameplay, we’ll talk about how to write a level editor, as well as implement saving and loading from a server.